Visual testing
I guess every front-end developer had the experience of changing CSS in one place and then breaking stuff in another. If you break it hard enough, your e2e tests or integration tests (or even component tests) might catch it. But there are also cases where elements move unexpectedly, change slightly in size, or cover parts of the UI.
These are harder to catch. One way to deal with those errors is to use visual regression tests. These tests visually compare images of a previous run with the current version of your app. If the images do not match, the test fails.
This can lead to flaky tests. But if used sparingly and controlled, it can be a great tool to combat unforeseen consequences. Additionally, it is a nice way to keep a visual log of your application throughout its versions.
Let's talk about how to do visual regression testing using Cypress.
Running visual tests
In order to do visual regression testing in Cypress you need:
- Cypress (duh)
- a visual regression plugin
- a way to store baseline images for comparison
I am not going over how to install Cypress, their documentation is pretty good, but I'll quickly show you how to set up a visual regression plugin. Cypress lists several visual regression plugins, including commercial ones. To get started, however, I recommend using uktrade/cypress-image-diff. It's still pretty new, but well supported and easy to install. To get you started, just follow the instructions in their Github repo.
I recommend writing a visual test each for your most important pages. If you have dynamic parts, you should use fixtures (for example using cy.intercept). Let's use the index page of this blog as an example for a static page.
Let's write our first test! It's pretty straightforward:
describe('Visual-Test: Index', () => {
    it('should compare screenshot of the index page', () => {
        cy.visit('/');
        cy.compareSnapshot();
    })
})
When you run the tests for the first time, Cypress will create baseline images at cy.compareSnapshot and save them in the cypress-visual-screenshots/baseline folder by default. The files are named after the test. For me, it's called index.spec.png.
The next time you run the test it puts the new screenshots into cypress-visual-screenshots/comparison and runs pixelmatch to compare it to the baseline. If the images differ the test fails and a diff image is created, which highlights part of the image that changed. Let's say I accidently delete some of the CSS for my hero-block.
I ran the test again, it failed and this diff was created:
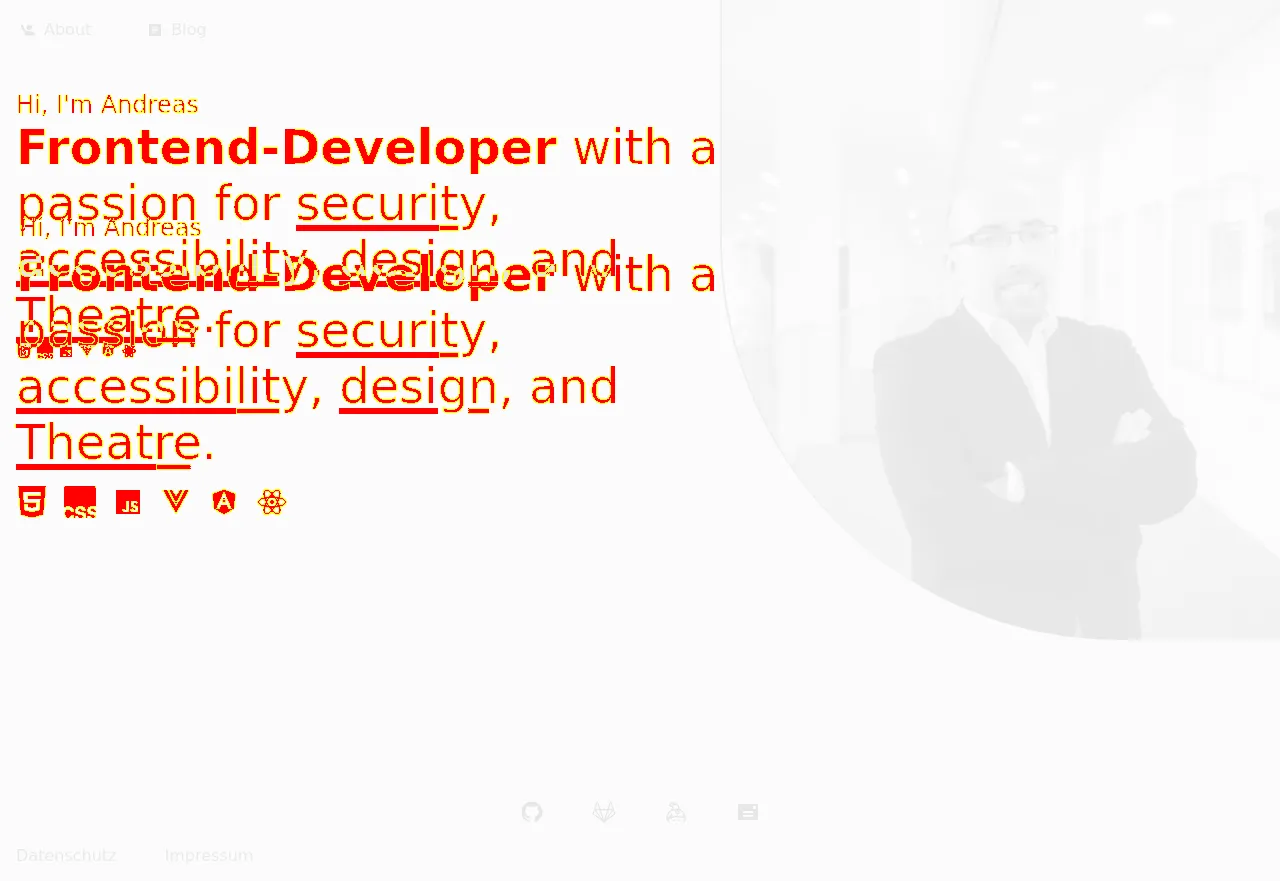
If you meant for the changes to occur you can replace your baseline image with the comparison image or delete the baseline image and run the test again. This updates your baseline.
Saving binary data in git
Over time you will likely amass a lot of images. Binary (and therefore un-diffable) data is difficult for git to handle. Your repo can get huge very quickly which makes several workflows (cloning, ci,...) more time-consuming.
There are several ways of dealing with this. IMO current best practice, if you work in a tight-knit team or alone, is to use git lfs, which keeps all but the most recent binary data only in the remote repository. You possibly need to configure our CI/CD environment after you initialized git lfs usage, though. For example, I had to configure Netlify.
There is also a possibility to store the image data externally (like on an FTP server) or using git submodules so that you do not pollute your main git repo at least. Submodules are a can of worms by themselves, though.
Reproducibility
In order for this to work, the screenshots need to look exactly the same when your UI has not changed. It is highly recommended to take the screenshots within a docker container.
You can mount your project dir into a docker container using the cypress:included image. You can use a command similar to the following:
docker run --rm -v $PWD:/app -w /app \
 --add-host=host.docker.internal:host-gateway \
 --user $(id -u):$(id -g) \
 cypress/included:9.1.1 \
 --config baseUrl=http://host.docker.internal:8080 \
 --browser chrome
You should add the --user parameter so the screenshots are not owned by root but by your user (and for security reasons). This makes handling the screenshots easier. Update: It was brought to my attention that this doesn't always work. Alternatively, you can run a recursive chown from inside the container using your user id and group.
If you depend on the client's timezone, or any other client environment variable within your application, you need to configure the container. For example, I had to set the timezone to CET using the TZ environment variable (TZ=Europe/Berlin).
Additional hints
You might want to add a way to test different viewports at once. I use a runPerViewport helper function. It changes the viewport automatically to our breakpoint boundaries using cy.viewport.
Also, by default, the library screenshot size is capped at 1280x720. So, even if you use cy.viewport the headless browser won't be rendered with a higher resolution than that. You can change this via environment variables.
If you have long pages (or on mobile) Cypress will seamlessly stitch screenshots together by default. So don't be alarmed. As long as it's reproducible it's fine.
If your entire page changes too much for a stable visual test, you can test elements instead. For this, you can use cy.get(SELECTOR).compareScreenshot().
If you have position:fixed elements, they might appear multiple times on long pages. You can either hide them as discussed above or change their CSS (for example using cy.invoke or cy.get(SELECTOR).then) to position them differently.
If you have consistently running animations, you should either disable them via CSS or hide them using cy.get(Selector).hideElement().
Conclusion
Since we set up visual testing at work, we caught a fair amount of unintended changes which were introduced by careless additions or sweeping refactorings.
Visual testing additionally provides a way to survey intentional and unintentional changes across teams quickly, using the baseline or comparison screenshots. The library I use also compiles a handy HTML report which you can share.
All in all, I think the time spent maintaining visual testing suites is totally worth it. You can refactor CSS more freely if you know that your UI only changes when and how you want it to change.